Breathtaking Tips About How To Use MOSFET As A Switch

Understanding the MOSFET
1. What's a MOSFET Anyway? (And Why Should You Care?)
Okay, picture this: you're building a cool electronic project, maybe a robot that makes coffee (ambitious, I know!), or a self-watering plant system (much more achievable, probably). At some point, you'll need a reliable way to turn things on and off with a small electrical signal. That's where the MOSFET, or Metal-Oxide-Semiconductor Field-Effect Transistor, struts onto the stage. Think of it as a tiny electronic gatekeeper, controlling a larger flow of electricity with a smaller one. It's the unsung hero of countless electronic devices, quietly doing its job.
Now, I know "Metal-Oxide-Semiconductor Field-Effect Transistor" sounds intimidating, like something out of a science fiction movie. But really, it's just a cleverly designed component that uses an electric field to control the flow of current. Imagine a water faucet; the MOSFET is like the handle, and the water is the electricity. A little turn of the handle (the electric field) controls the amount of water flowing (the current). Simple, right? (Well, maybe not totally simple, but we'll break it down.)
Why use a MOSFET instead of, say, a regular switch? Great question! MOSFETs are much faster, smaller, and more efficient than mechanical switches. They also don't suffer from contact bounce or wear and tear in the same way. This makes them ideal for high-speed switching applications and situations where reliability is key. Plus, they're controlled electronically, opening up a whole world of possibilities for automated systems. You cant just flip a switch with a microcontroller, but you can control a MOSFET.
So, in essence, the MOSFET acts as a voltage-controlled resistor. Apply a voltage to its gate (the control terminal), and the resistance between its drain and source terminals changes. This change in resistance dictates the current flow. When the gate voltage is off, the resistance is high, and very little current flows (switch is "off"). When the gate voltage is on, the resistance is low, and current flows freely (switch is "on"). This on/off functionality is what makes the MOSFET such a versatile switching device. Think of it as the light switch of the digital age!

The Key Players
2. Getting to Know the MOSFET's Anatomy
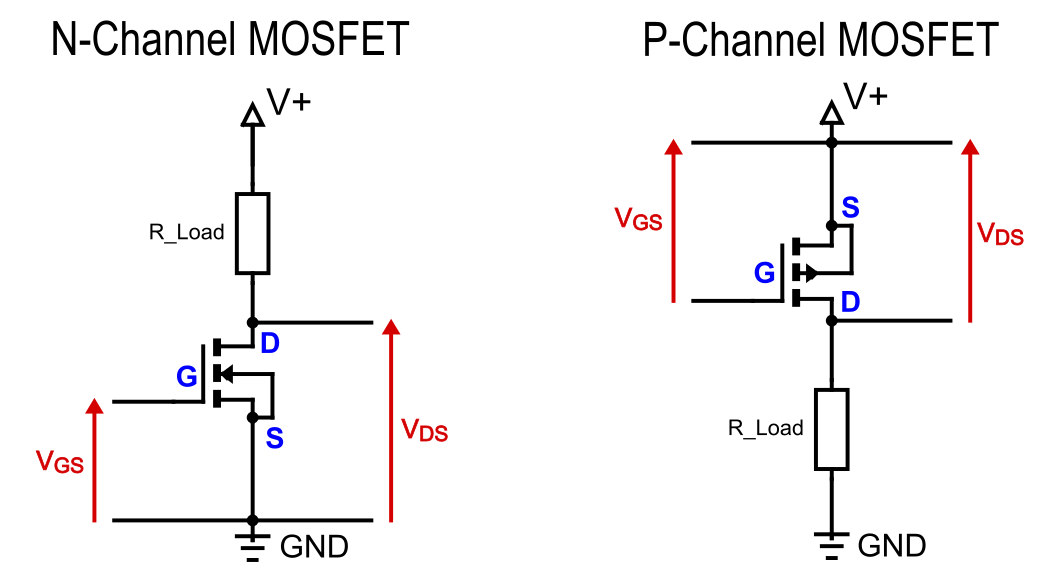
Alright, let's get acquainted with the players. A MOSFET typically has three terminals: the Gate (G), the Drain (D), and the Source (S). Think of them as the control center, the output, and the ground, respectively. The Gate is where you apply the control voltage that determines whether the MOSFET is on or off. The Drain is where the current enters the MOSFET, and the Source is where the current exits. Understanding these terminals is crucial to using a MOSFET effectively as a switch.
Now, heres where it gets a little tricky (but stick with me!). MOSFETs come in two flavors: N-channel and P-channel. The main difference lies in how they're turned on. An N-channel MOSFET turns on when the Gate voltage is higher than the Source voltage. Think "N for 'Needs High.'" Conversely, a P-channel MOSFET turns on when the Gate voltage is lower than the Source voltage. Think "P for 'Pulled Low.'" This difference in polarity affects how you'll incorporate them into your circuit. Getting this backwards is a common mistake, so double-check before you connect anything!
Identifying which pin is which on your MOSFET is essential. The datasheet for your specific MOSFET is your best friend here. Datasheets are readily available online and provide detailed information about the device, including pinout diagrams and electrical characteristics. Don't skip this step! A wrongly connected MOSFET can lead to unexpected (and sometimes spectacular) results. Trust me, I've seen it happen (more than once!). Using a multimeter to test conductivity between the pins can also help you determine which pin is which, especially if the markings are unclear.
Also, pay attention to the MOSFET's voltage and current ratings. Exceeding these limits can damage or destroy the device. The datasheet will specify the maximum voltage that can be applied between the Drain and Source (Vds), as well as the maximum current that can flow through the MOSFET (Id). Always operate within these limits to ensure the longevity and reliability of your circuit. Nobody wants their coffee-making robot to short-circuit and explode (metaphorically speaking, of course).
Wiring It Up
3. Putting the MOSFET to Work
Okay, let's get our hands dirty and build a simple circuit to demonstrate how to use a MOSFET as a switch. We'll start with an N-channel MOSFET because they're generally easier to work with. You'll need a few components: the N-channel MOSFET, a resistor (around 1k to 10k), a power supply (e.g., 5V), an LED, and another resistor for the LED (typically 220 to 470 depending on your LED). Dont forget your breadboard! Building on a breadboard makes prototyping a breeze and minimizes soldering mishaps.
First, connect the Source pin of the MOSFET to ground. This provides the reference point for our circuit. Then, connect the Drain pin to one end of the LED's resistor. The other end of the LED's resistor goes to the positive rail of your power supply (e.g., 5V). This forms the path for the current to flow when the MOSFET is turned on. The resistor is there to protect the LED from burning out. Its a small price to pay for avoiding that acrid burning smell and a non-functioning LED.
Now, for the control part. Connect one end of the 1k to 10k resistor to the Gate pin of the MOSFET. Connect the other end of the resistor to a wire that you can use to apply a voltage (either to ground or to your power supply voltage). This resistor, sometimes called a "pull-down" resistor, ensures that the Gate is held at a low voltage (off state) when you're not actively applying a signal. Without it, the Gate could float at an undefined voltage, causing unpredictable behavior.
To turn the LED on, connect the wire to your power supply voltage (e.g., 5V). This applies a positive voltage to the Gate, turning on the N-channel MOSFET and allowing current to flow through the LED. To turn the LED off, disconnect the wire or connect it to ground, removing the voltage from the Gate and switching off the MOSFET. Voila! You've successfully used a MOSFET as a switch! You are now officially cooler than you were five minutes ago.

Fine-Tuning
4. Making Your MOSFET Switch Rock Solid
Alright, you've got the basics down, but like any good craftsman, you need to understand the nuances to truly master the art of using a MOSFET as a switch. One crucial aspect is the Gate Threshold Voltage (Vgs(th)). This is the minimum voltage that needs to be applied to the Gate to turn the MOSFET on. It's specified in the datasheet, and it's important to ensure that the voltage you're applying to the Gate is sufficient to fully switch the MOSFET on.
Another thing to consider is the switching speed. While MOSFETs are generally fast, they're not instantaneous. There's a small delay between when you apply the voltage to the Gate and when the MOSFET fully turns on or off. This delay is influenced by the Gate capacitance and the Gate resistor. For high-frequency switching applications, you might need to choose a MOSFET with a lower Gate capacitance and optimize the Gate resistor to minimize switching losses. These losses can manifest as heat, which we definitely want to avoid.
Heat dissipation is also something to keep an eye on, especially when switching large currents. MOSFETs generate heat when they're switching, and excessive heat can damage them. If you're switching a significant amount of current, consider using a heatsink to help dissipate the heat. The datasheet will specify the MOSFET's thermal resistance, which will help you determine if a heatsink is necessary. A properly sized heatsink can make the difference between a reliable circuit and a smoky disaster.
Finally, remember that MOSFETs are sensitive to static electricity. Before handling them, ground yourself to discharge any static electricity that might be lurking on your clothes or body. Static discharge can damage the MOSFET's delicate Gate oxide layer, rendering it useless. Use an anti-static wrist strap and work on an anti-static mat to minimize the risk of static damage. It's a small precaution that can save you a lot of headaches (and ruined MOSFETs!).

Beyond the Basics
5. Taking Your MOSFET Skills to the Next Level
So, you've mastered the simple LED switching circuit. What's next? Well, the possibilities are practically endless! MOSFETs can be used to control motors, solenoids, relays, and all sorts of other power-hungry devices. By using a microcontroller to control the Gate voltage, you can create sophisticated automated systems. Imagine a robot controlled entirely by code, using MOSFETs to drive its motors and sensors.
One common application is pulse-width modulation (PWM). PWM involves rapidly switching a MOSFET on and off to control the average power delivered to a load. By varying the "duty cycle" (the percentage of time the MOSFET is on), you can precisely control the speed of a motor, the brightness of an LED, or the temperature of a heating element. PWM is a powerful technique used in countless electronic devices, from motor controllers to dimmers.
MOSFETs are also used extensively in power supplies. They're the workhorses of switching regulators, which convert one voltage level to another with high efficiency. Switching regulators are essential in everything from laptops to smartphones, providing the various voltage levels needed by different components. The efficient switching of MOSFETs is what allows these devices to operate for extended periods on battery power.
You can even use MOSFETs to create audio amplifiers. By carefully biasing the MOSFET and applying a small input signal to the Gate, you can amplify the signal and drive a speaker. MOSFET-based amplifiers offer excellent sound quality and are often preferred by audiophiles. It's a testament to the versatility of the MOSFET that it can be used in both power control and audio amplification applications. So, keep experimenting, keep learning, and keep building!

MOSFET As A Switch Using Arduino Tutorial 21 Proteus Simulation
FAQ
6. Demystifying the MOSFET
Q: What happens if I connect the MOSFET backwards?A: Connecting a MOSFET backwards can lead to catastrophic failure. Depending on the configuration, it could short circuit your power supply, potentially damaging the MOSFET and other components in your circuit. Always double-check the pinout and polarity before connecting anything! Remember, datasheets are your friends.
Q: Can I use a MOSFET to switch AC voltage?A: Yes, but it requires careful consideration. You'll typically need to use a MOSFET specifically designed for AC switching, often with a snubber circuit to protect it from voltage spikes. It's also important to isolate the control circuitry from the AC voltage for safety reasons. Working with AC voltage can be dangerous, so proceed with caution and consult with an experienced engineer if you're unsure.
Q: How do I choose the right MOSFET for my application?A: Choosing the right MOSFET depends on the specific requirements of your application. Consider the voltage and current ratings, the switching speed, the Gate threshold voltage, and the thermal resistance. The datasheet is your best resource for finding this information. Also, consider the type of load you'll be switching (resistive, inductive, capacitive) and any specific requirements for that type of load.
Q: My MOSFET is getting really hot. What should I do?A: If your MOSFET is getting hot, it means it's dissipating a lot of power. Check the current flowing through the MOSFET and make sure it's within the device's ratings. Ensure that the Gate voltage is sufficient to fully turn on the MOSFET, as operating in the linear region can lead to increased power dissipation. Consider using a heatsink to dissipate the heat, or choose a MOSFET with a lower on-resistance (Rds(on)) to reduce power losses.